
As a procurement professional, you are the gatekeeper of quality and reliability for your company. You understand that even the smallest fastener can be the difference between a successful project and a costly failure. When it comes to creating strong, pivoting joints in machinery and equipment, the clevis pin is a fundamental component. But this simple pin is only as good as the method used to retain it. That's where its crucial partner, the cotter pin, comes in. This comprehensive guide will walk you through everything you need to know about the clevis pin and its securing mechanisms. We'll explore its design, applications, and the best practices for its use. By the end, you'll be equipped with the knowledge to source these critical parts with confidence, ensuring every connection you specify is both robust and secure.
What Exactly is a Clevis Pin and How Does This Fastener Work?
A clevis pin is a simple yet incredibly effective type of fastener. At its most basic, it's a cylindrical pin with a head at one end and a small cross-drilled hole at the other. The head acts as a stop, preventing the pin from pulling all the way through the connection. The hole at the opposite end is the key to its function; it's designed to accept a securing device, like a cotter pin or a clip, which keeps the clevis pin from backing out of the hole it's in. This simple design makes it an ideal choice for creating a pivot point or a movable connection between two components.
The primary use of a clevis pin is to connect parts that need to articulate or rotate. Think of it as a removable hinge pin. When the clevis pin is inserted through the aligned holes of two or more components, it allows for angular movement while still holding the parts together. Unlike a bolt, it doesn't clamp the parts together with tension. Instead, it bears shear load, which is the force trying to cut the pin in half. This makes the clevis pin perfect for applications where you need a strong, reliable link that can also be easily disassembled for maintenance or adjustments. The simplicity of its installation and removal is a major advantage in many mechanical systems.
Its function is straightforward but vital. A clevis pin serves as the axle in a simple rotating joint. For anyone needing to attach a lever, a rod, or a linkage, this fastener provides a dependable and straightforward solution. The strength of the clevis pin lies in its ability to handle these shear forces effectively, making it a trusted component in countless mechanical assemblies.
What is a Clevis Pin Used In Conjunction With in a Typical Assembly?
A clevis pin rarely works alone. It is a key element within a broader clevis fastening system. Most commonly, a clevis pin is used in conjunction with a clevis, which is a U-shaped metal bracket. This clevis is also sometimes called a yoke. The clevis has two arms with holes at their ends, and the component it needs to connect to will have a single hole (often called a tang). The assembly process is intuitive: the tang is placed between the two arms of the clevis, and the holes are all aligned.
Once the holes are lined up, the clevis pin is inserted through all three layers—the first clevis arm, the tang, and the second clevis arm. This creates a secure, pivoting connection. This arrangement, a clevis pin in conjunction with a u-shaped bracket, is seen everywhere. It's the standard system for connecting control rods, linkages, and tow bars. The clevis provides a strong and stable housing, while the clevis pin acts as the pivot, allowing for the necessary range of motion.
This system is highly valued for its strength and simplicity. The clevis bracket contains the forces, directing them onto the clevis pin, which is designed to handle the resulting shear stress. This complete assembly—the U-shaped clevis and the clevis pin—forms a robust joint that is essential in equipment across many industries. This is the primary way a clevis pin is intended to be used.
How Do You Properly Secure a Clevis Pin After Installation?
The single most important step after you insert a clevis pin is to secure it. The hole drilled through the end of the pin is not just a minor feature; it is essential for the safety and integrity of the entire joint. If the clevis pin is not secured, vibrations and movement can cause it to gradually work its way out of the hole, leading to a complete failure of the connection. This could have catastrophic consequences, especially in heavy machinery or vehicle applications.
To prevent this, a retaining device must be passed through the hole at the end of the pin. The most traditional and widely used retainer is the cotter pin. Other common options include R-clips, bridge pins, and certain types of retaining rings. Each of these devices works by physically blocking the clevis pin from backing out. The choice of which one to use often depends on the application and how frequently the pin needs to be removed.
The goal is to secure the clevis pin in a way that is both reliable and appropriate for the operating conditions. For a permanent or semi-permanent installation, a cotter pin is often the best choice because it provides a very secure lock. For applications requiring frequent and fast removal without tools, an R-clip might be more suitable. Regardless of the method, this final step is non-negotiable for a safe and functional clevis joint. You always need to secure the pin.
What are the Different Types of Clevis Pins and Retainers?
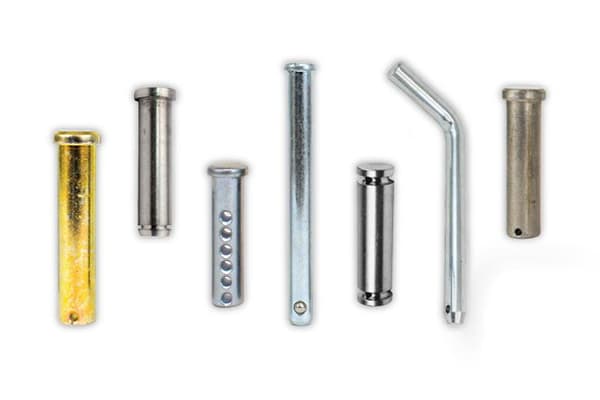
While the basic design of a clevis pin is standard, there are variations to suit different needs. The most common type is the standard headed clevis pin, featuring a flat or domed head. Some pins, known as universal pins, may have cross-drilled holes at both ends, offering more flexibility. Another variation is the grooved clevis pin, which has a groove machined near the end instead of a hole. This groove is designed to accept an E-clip or a specific type of retaining ring.
Just as there are different types of pins, there are various ways to retain them. Let's look at the most common ones:
| Retainer Type | Description | Common Use Case |
|---|---|---|
| Cotter Pin | A split pin made of soft metal wire. Inserted and bent to lock. | High-vibration, semi-permanent assemblies. |
| R-Clip | A single piece of spring steel shaped like the letter 'R'. Snaps on. | Quick-release applications, agricultural equipment. |
| Hitch Pin Clip | A large, squared-off spring clip often used with hitch pins. | Towing and heavy-duty connections. |
| E-Clip | A C-shaped stamped metal ring that snaps into a groove. | Use with grooved pins in compact assemblies. |
Each of these retaining devices has its own advantages. The cotter pin offers maximum security. The R-clip offers maximum convenience. An E-clip is great for applications where there isn't much clearance around the pin. As a procurement officer, understanding these options allows you to specify the complete fastening system that will work well for your specific engineering requirements.
How is a Cotter Pin Specifically Used with a Clevis Pin?
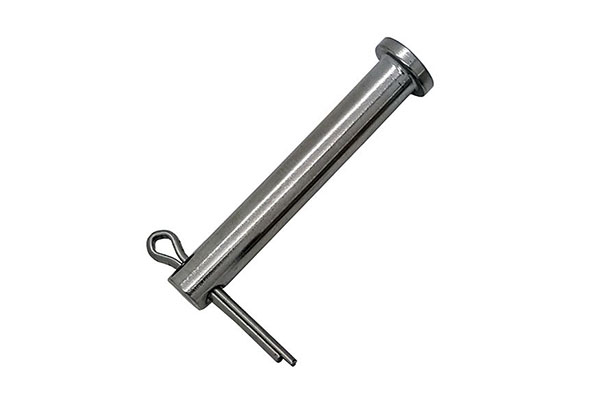
Using a cotter pin is the classic method to secure a clevis pin. A cotter pin, also known simply as a cotter, looks like a metal hairpin. It's typically made from a soft temper metal wire with a half-round profile, which is bent in half, leaving a loop or eyelet at one end. This design is key to its locking function. The process to use it is simple and effective, and it’s one of the most reliable ways to retain a clevis pin.
The installation process starts after the clevis pin has been inserted through the components. You take the straight end of the cotter pin and insert it into the cross-drilled hole in the clevis pin. Push it all the way through until the eyelet at the head of the cotter is snug against the side of the clevis pin. Now, the cotter pin is in place, but it's not yet locked.
The final and most crucial step is to bend the two tines (the long, straight parts) of the cotter in opposite directions. A common practice is to bend one tine up and over the end of the shank of the clevis pin, and the other tine down against the side of the nut or component. This action locks the cotter pin firmly in place, making it impossible for it to fall out. This simple bending of the wire is what provides the incredibly secure connection that pins are used for in high-vibration environments. The cotter ensures the clevis pin stays put.
What Materials are Clevis Pins Commonly Made From?
The material of a clevis pin is critical to its performance, dictating its strength, durability, and resistance to corrosion. The vast majority of clevis pins are commonly used in applications made from steel. The most common option is a low-carbon steel that is plated with zinc. This zinc coating provides a good level of corrosion resistance for general-purpose use in dry or mild environments. It's a cost-effective solution for many industrial and automotive applications.
For more demanding environments, stainless steel is the material of choice. There are two primary grades of stainless used for a clevis pin:
- 18-8 / 304 Stainless Steel: This is the most common grade of stainless steel. It offers excellent corrosion resistance in most atmospheric conditions and is suitable for a wide range of applications, from construction to food processing equipment.
- 316 Stainless Steel: This is a premium, marine-grade stainless. It contains molybdenum, which gives it superior resistance to chlorides (like salt water) and other harsh chemicals. A 316 stainless steel clevis pin is essential for any marine application or in environments with chemical exposure.
In some specialized cases, a clevis pin might be made from other materials like brass for its non-sparking properties or high-strength alloy steels for extreme load applications. As a manufacturer, we at Hebei Wuyang Fastener Co., Ltd. work with a range of materials to produce fasteners that meet the precise needs of our clients. Just as with our specialized carbon steel rail fish bolts, we understand that the right material is the foundation of a reliable product.
Which Key Industries Make Frequent Use of a Clevis Pin?
The versatility and reliability of the clevis pin mean it is found in almost every major industry. Its ability to create a strong, quick-release pivot makes it an indispensable piece of hardware. In the agriculture and agricultural industries, clevis pins (often in the form of hitch pins) are fundamental. They are used to attach implements like plows and trailers to tractors. The ability to quickly connect and disconnect equipment is essential for farm productivity.
In the construction industry, you'll find the clevis pin used in scaffolding to connect frames, in heavy machinery for attaching buckets and blades, and in rigging systems for lifting heavy loads. The automotive sector uses them in linkages for brakes and clutches. The marine world relies heavily on stainless steel clevis pins for boat rigging, to attach sails and anchor chains where strength and corrosion resistance are paramount.
Even the highly regulated aircraft industry makes extensive use of a specialized type of clevis pin, often called a NAS (National Aerospace Standard) pin, for flight control systems and ground support equipment. The simple, reliable design of the clevis pin has proven its worth time and again. It's a simple fastener that is trusted to perform in some of the most demanding applications on earth. Its wide use is a testament to its effective design.
How Do You Select the Correct Diameter and Length for a Clevis Pin?
Choosing the right size for a clevis pin is critical for a safe and functional joint. There are two primary measurements to consider: the diameter and the effective length. The diameter of the clevis pin should be selected to match the hole in the clevis and the component it is connecting. The fit should be snug, with minimal play or slop. A loose fit will cause the pin to rattle and wear out the holes over time, while a fit that is too tight will make installation difficult and prevent free pivoting movement.
The length is just as important. The "effective length" of a clevis pin is the measurement from the underside of the head to the cross-drilled hole. This length must be slightly longer than the combined thickness of the components being joined. This extra space ensures that there is enough of the pin protruding to properly install the cotter pin or retaining clip. If the pin is too short, you won't be able to secure it. If it's too long, the connection will be sloppy and the pin may be subjected to excessive bending forces.
Always measure the total thickness of your assembly and choose a clevis pin with an effective length that is just slightly greater. This ensures a tight, secure fit without compromising the function of the joint. Precise measurement is key to selecting the correct fastener for the job.
What is the Best Way to Install and Remove a Clevis Pin System?
The beauty of the clevis pin system is its ease of use. Both installation and removal are straightforward processes that can typically be done with basic hand tools.
To install a clevis pin:
- Align the Holes: Position the components so that all the holes are perfectly aligned.
- Insert the Pin: Slide the clevis pin through the aligned holes until the head is seated firmly against the outer face of the component.
- Secure the Pin: Insert your chosen retainer—such as a cotter pin—through the cross-drilled hole at the end of the pin.
- Lock the Retainer: If using a cotter pin, bend the tines in opposite directions to lock it in place. If using an R-clip, simply snap it on. Your connection is now secure.
To remove a clevis pin:
- Remove the Retainer: Straighten the legs of the cotter pin with pliers and pull it out, or simply pull off the R-clip.
- Remove the Pin: Once the retainer is removed, the clevis pin can be easily pushed or pulled out of the hole.
This simple process is a major advantage of clevis fastening systems. It allows for rapid assembly and disassembly in the field, which is why it is so popular in applications like agricultural equipment and theatrical rigging. The process is designed to be simple and efficient.
Why Should You Partner with a Reliable Clevis Pin Manufacturer?
As a Senior Procurement Officer, you know that sourcing components like a clevis pin is about more than just finding the lowest price. It’s about ensuring quality, reliability, and a smooth supply chain. A crucial pain point for buyers is receiving fasteners with inconsistent material quality or fraudulent certifications. A reliable manufacturer provides complete traceability and material certifications for every batch, whether it's standard zinc-plated steel or marine-grade 316 stainless steel. This guarantees that the clevis pin you receive has the strength and corrosion resistance your project demands.
Another major concern is precision. A clevis pin must be manufactured to tight tolerances for both its diameter and the location of its hole. An improperly placed hole can make it impossible to secure the clevis pin, rendering it useless. At Hebei Wuyang Fastener, our modern production lines and rigorous quality control ensure that every clevis pin we produce meets exact specifications. This commitment to quality extends to all our products, from simple washers to complex DIN931 hex bolts with half thread.
Finally, strong communication and partnership are key. You need a supplier who understands your technical needs and can provide solutions, including custom designs. As a dynamic factory committed to both standard parts and R&D, we work closely with our clients to solve their fastening challenges. Partnering with a trustworthy manufacturer like us means you can be confident that the component you use will perform safely and reliably, protecting your projects from delays and failures.
Key Takeaways to Remember
When specifying and sourcing a clevis pin, keep these essential points in mind:
- Function: A clevis pin is designed to create a strong, pivoting joint and must handle shear loads.
- Security is Paramount: The pin is useless unless it is properly secured. The cotter pin is the most traditional and reliable method to retain it.
- The System: A clevis pin is typically used in conjunction with a U-shaped clevis bracket to form a complete, functional assembly.
- Material Choice: Select the material (e.g., zinc-plated steel, stainless steel) based on the environmental conditions of the application.
- Correct Sizing: The diameter should provide a snug fit, and the effective length must be slightly greater than the total thickness of the parts being joined.
- Supplier Reliability: Partner with a manufacturer who can provide material certifications, guarantee precise tolerances, and offer clear communication to ensure you get a quality fastener every time.
Post time: 09-19-2025


